Jesse Cravens

Building Modern Web Applications and Teams that Deliver

Build a Milestone Calendar With IndexedDB and FullCalendar.js

IndexedDB is a persistent object data store in the browser. Although it is not a full SQL implementation and it is more complex than the unstructured key–value pairs in localStorage, you can use it to define an API that provides the ability to read and write key–value objects as structured JavaScript objects, and an indexing system that facilitates filtering and lookup.

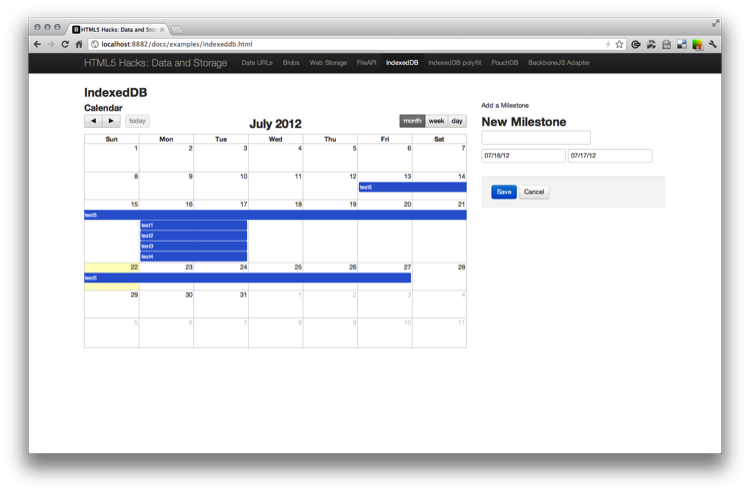
For this hack we will use IndexedDB to store milestone objects for a calendar application. The UI will provide a simple means to create a new milestone and provide a title, start date, and end date. The calendar will then update to show the contents of the local data store. Figure 6-8 shows the result.

Figure 6-8. FullCalendar.js and IndexedDB

Figure 6-8

We need to start by including the markup for the two pieces of the UI: the calendar and the form. We’ll begin with the form. You may notice that the input fields for the dates include data-date-format attributes. We will use these later for the JavaScript date pickers.

milestone form
1
2
3
4
5
6
7
8
9
10
11
12
13
14
15
16
17
18
19
20
21
22
<form>
     <fieldset>

       <div class="control-group">
         <label class="control-label">Add a Milestone</label>
         <div class="controls">
           <h2>New Milestone</h2>
           <input type="text" name="title" value="">
           <input type="text" class="span2" name="start"
             value="07/16/12" data-date-format="mm/dd/yy" id="dp1" >
           <input type="text" class="span2" name="end"
             value="07/17/12"  data-date-format="mm/dd/yy" id="dp2" >
         </div>
       </div>

       <div class="form-actions">
          <button type="submit" class="btn btn-primary">Save</button>
          <button class="btn">Cancel</button>
       </div>

      </fieldset>
 </form>

The calendar is provided by FullCalendar.js, a fantastic jQuery plug-in for generating robust calendars from event sources. The library will generate a calendar from a configuration object and a simple div.

simple div
1
<div id='calendar'></div>

And we can’t forget to include a few dependencies:

CSS and JavaScript dependencies
1
2
3
4
5
6
<link href="../assets/css/datepicker.css" rel="stylesheet">
<link href="../assets/css/fullcalendar.css" rel="stylesheet">

<script src="http://code.jquery.com/jquery-1.7.1.min.js"></script>
<script src="../assets/js/bootstrap-datepicker.js"></script>
<script src="../assets/js/fullcalendar.min.js"></script>

To improve the user experience, we will also include date pickers for choosing the dates within the form fields for start and end dates (see Figure 6-9).

Figure 6-9. Date pickers

Figure 6-9

To instantiate the date pickers we will include the following toward the beginning of our script:

instantiate the date pickers
1
2
3
4
$(function(){
    $('#dp1').datepicker();
    $('#dp2').datepicker();
  });

The Milestone IndexedDB

Now we will set up a global namespace to hold our code, and set up a public milestones array (within the namespace) to hold our milestones temporarily while we pass them between our database and the FullCalendar API. This should make more sense as you continue to read. While we are at it we will need to normalize our indexedDB variable across all of the vendor-specific properties.

namespace and normalize
1
2
3
4
5
6
7
8
9
10
11
12
13
14
15
16
17
18
19
20
var html5hacks = {};

html5hacks.msArray = [];

var indexedDB = window.indexedDB || window.webkitIndexedDB ||
                window.mozIndexedDB;

if ('webkitIndexedDB' in window) {
  window.IDBTransaction = window.webkitIDBTransaction;
  window.IDBKeyRange = window.webkitIDBKeyRange;
}
Now we can begin to set up our database:
html5hacks.indexedDB = {};
html5hacks.indexedDB.db = null;

function init() {
  html5hacks.indexedDB.open();
}

init();

This will obviously fail for now, but as you can see the initialization begins by calling the open() method on an html5hacks.indexedDB. So let’s take a closer look at open():

open()
1
2
3
4
5
6
7
8
9
10
11
12
13
14
15
16
17
18
19
20
21
22
23
24
25
26
27
28
29
30
31
html5hacks.indexedDB.open = function() {

  var request = indexedDB.open("milestones");

  request.onsuccess = function(e) {
    var v = "1";
    html5hacks.indexedDB.db = e.target.result;

    var db = html5hacks.indexedDB.db;

    if (v!= db.version) {
      var setVrequest = db.setVersion(v);
      setVrequest.onerror = html5hacks.indexedDB.onerror;

      setVrequest.onsuccess = function(e) {
        if(db.objectStoreNames.contains("milestone")) {
          db.deleteObjectStore("milestone");
        }

        var store = db.createObjectStore("milestone",
          {keyPath: "timeStamp"});

        html5hacks.indexedDB.init();
      };
    }
    else {
      html5hacks.indexedDB.init();
    }
  };
  request.onerror = html5hacks.indexedDB.onerror;
}

First, we need to open the database and pass a name. If the database successfully opens and a connection is made, the onsuccess() callback will be fired.

Within the onsuccess, we then check for a version and call setVersion() if one does not exist. Then we will call createObjectStore() and pass a unique timestamp within the keypath property.

Finally, we call init() to build the calendar and attach the events present in the database.

onsuccess()
1
2
3
4
5
6
7
8
9
10
11
12
13
14
15
16
17
18
19
20
21
22
23
24
25
26
27
28
29
30
31
32
33
34
35
36
37
html5hacks.indexedDB.init = function() {

  var db = html5hacks.indexedDB.db;
  var trans = db.transaction(["milestone"], IDBTransaction.READ_WRITE);
  var store = trans.objectStore("milestone");

  var keyRange = IDBKeyRange.lowerBound(0);
  var cursorRequest = store.openCursor(keyRange);

  cursorRequest.onsuccess = function(e) {
    var result = e.target.result;

    if(!result == false){

        $('#calendar').fullCalendar({
          header: {
            left: 'prev,next today',
            center: 'title',
            right: 'month,agendaWeek,agendaDay'
          },
          weekmode: 'variable',
          height: 400,
          editable: true,
          events: html5hacks.msArray
        });

      return;

    }else{

      console.log("result.value" , result.value);
      buildMilestoneArray(result.value);
      result.continue();
    }
  };
  cursorRequest.onerror = html5hacks.indexedDB.onerror;
};

At this point we are poised to retrieve all the data from the database and populate our calendar with milestones. First, we declare the type of transaction to be a READ_WRITE, set a reference to the datastore, set a keyrange, and define a cursorRequest by calling openCursor and passing in the keyrange. By passing in a 0, we ensure that we retrieve all the values greater than zero. Since our key was a timestamp, this will ensure we retrieve all the records.

Once the onsuccess event is fired, we begin to iterate through the records and push the milestone objects to buildMilestoneArray:

buildMilestoneArray()
1
2
3
4
5
6
7
8
9
10
11
12
13
14
15
16
17
function buildMilestoneArray(ms) {
  html5hacks.msArray.push(ms);
}
When we reach the last record, we build the calendar by passing a configuration object to fullCalendar() and returning:
        $('#calendar').fullCalendar({
          header: {
            left: 'prev,next today',
            center: 'title',
            right: 'month,agendaWeek,agendaDay'
          },
          weekmode: 'variable',
          height: 400,
          editable: true,
          events: html5hacks.msArray
        });

      return;

Adding Milestones

Now that we are initializing and building our calendar, we need to begin adding milestones to the database via the form. First let’s use jQuery to set up our form to pass a serialized data object to addMilestone() on each submission:

form submit
1
2
3
4
5
6
7
$('form').submit(function() {

    var data = $(this).serializeArray();

    html5hacks.indexedDB.addMilestone(data);
    return false;
  });

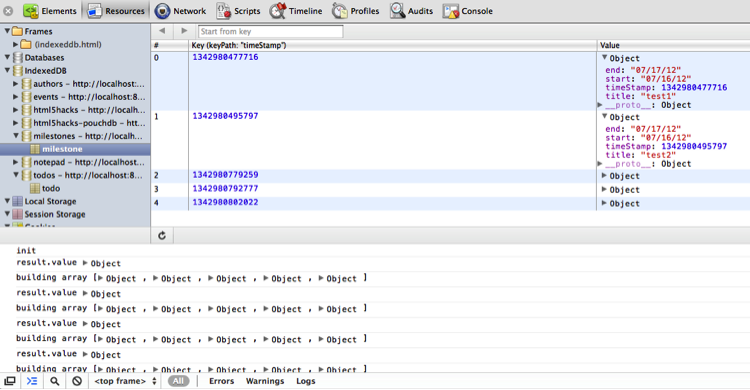
Now let’s submit a few events and then view them in the Chrome Inspector to ensure they are there (see Figure 6-10).

Figure 6-10. Viewing milestone objects in the Chrome Inspector

Figure 6-10

Let’s take a closer look at our addMilestone method:

addMilestone()
1
2
3
4
5
6
7
8
9
10
11
12
13
14
15
16
17
18
19
20
21
22
23
html5hacks.indexedDB.addMilestone = function(d) {
  var db = html5hacks.indexedDB.db;
  var trans = db.transaction(["milestone"], IDBTransaction.READ_WRITE);
  var store = trans.objectStore("milestone");

  var data = {
    "title": d[0].value,
    "start": d[1].value,
    "end": d[2].value,
    "timeStamp": new Date().getTime()
  };

  var request = store.put(data);

  var dataArr = [data]
  request.onsuccess = function(e) {
    $('#calendar').fullCalendar('addEventSource', dataArr);
  };

  request.onerror = function(e) {
    console.log("Error Adding: ", e);
  };
};

We established our read/write connection in much the same way as our html5hacks.indexedDB.init(), but now, instead of only reading data, we write a data object to the data store each time by calling store.put() and passing it data. On the onsuccess we then can call fullcalendar’s addEventSource() and pass it the data wrapped in an array object. Note that it is necessary to transform the data object into an array since that is what the FullCalendar API expects.

Comments